Want to know The Truth About CPM?
Showing posts with label Business Rules. Show all posts

11 August 2014

Enhanced Planning Validations: Part 2

Introduction

At the end of July Tyler Feddersen very generously wrote part one of this two part series on data validation in Planning; you now are reading the concluding entry.  I’ll let Tyler do the explaining below but I want to make sure you, Gentle Reader, understand that other than this introduction and a super short concluding paragraph that everything is 100% Tyler’s.  I don’t have many guest bloggers (if you are interested send me a comment via this blog or a LinkedIn message) but I am always beyond happy to use my blog as a platform for sharing information.  

Thanks must also go out to Performance Architects – not many companies (in my experience, “not many” should read “just about none”) would allow one of their employees to write for something other than their blog.  PA are to be commended for their spirit of information sharing.  Chuck Persky, whom I know from the long ago days of ISA (and thus my connection to PA), will be presenting at Oracle Open World – if you are going to that event I encourage you to attend his session Oracle Planning and Budgeting Cloud Service: Oracle Hyperion Planning in the Cloud [UGF9091] on Sunday, 28 September.  I’m not presenting on that Sunday (or at all at OOW, for that matter – sanity occasionally comes my way), but I am the guy who solicited the ODTUG EPM user group sessions.  And lest unworthy thoughts enter your mind,  I reached out to Chuck long before this blog post was written – there is no quid pro quo.

With that, enjoy.

Tyler Feddersen, Performance Architects

Let’s take it a step further


If you are reading this and have not read Part 1, I would definitely recommend stopping now and doing so. The rest of this blog will be taking the results of Part 1 and taking it a step further in creating a pretty good overall validation solution.

The validation process discussed in Part 1 was a simple way to be able to identify errors that would cause data integrity issues. However, it does not prevent them. This is the part of the process that Part 2 will attempt to accomplish.

A Look Ahead


Each individual step with this solution is fairly simple and direct. However, the process that combines them all starts to get a little confusing. Let’s take a glance at the general process flow that an end user would go through when working with this technique.

  1. The user completes all necessary data entries
  2. Following data entry, the user would change a lock status to “Locked”
    1. Done through a separate entry form
    2. A business rule checks for any errors prior to allowing the lock
    3. Causes a flag to show as “Locked”, which also prevents additional business rule execution
  3. If Process Management is used, the user would approve the entity, which would validate against the data form used in Step #2
    1. If approvals process finds that the entity has not gone through the initial locking process, an error will be displayed
    2. By successfully approving, the user is no longer the owner of the entity
  4. Following a successful approval, the user is no longer able to perform any data entry, which means that the initial lock in Step #2 cannot be reverted
  5. At this point, the user would need to have the entity sent back through Process Management in order to perform any further data modifications

The end result of the process allows for analysts and administrators to switch their focus to more business-related issues rather than focusing on locking down the system and having to check for all of the typical data entry errors. Administrators generally have to pick a universal end date to lock down the system in order to be assured that users are not making additional changes. With the process mentioned above, budgets and forecasts can be potentially analyzed as they are completed since a user’s ability to make any modifications is removed as soon as everything is approved.

The important part to remember is that this process is done completely using out-of-the-box functionality. If there is anything through the steps that you feel could be simplified….it probably could. But this will at least get us started.

Step 1: Dimensionality


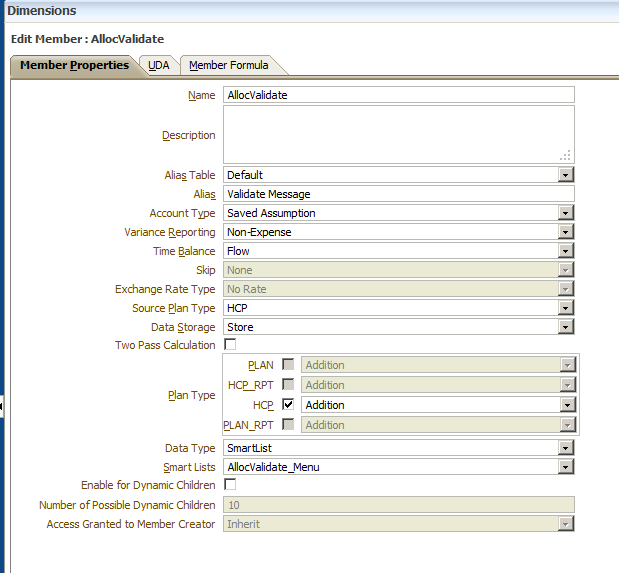
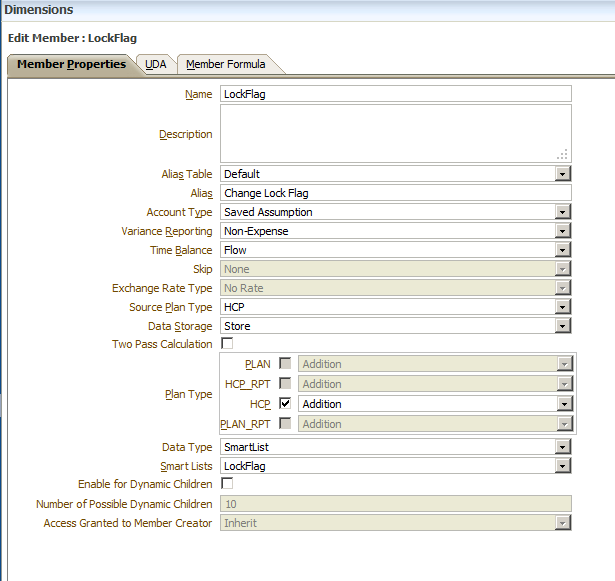
If you recall from Part 1, I created two validation members: AllocValidate and Validate. AllocValidate was created in the dense Accounts dimension  while the Validate member was created within a sparse dimension, to give us block suppression capabilities. For this portion of the validation process, I created an additional Accounts member, LockFlag. This new member will be used in coordination with the previously created member, AllocValidate, to create a locking “flag” that all business rules can use to decide whether the rule should continue to process or not.

Additionally, I added a “NO_XXXX” for each dimension. The flag only needs to be stored at the Entity level, so each dimension outside of Accounts, Period, Scenario, Version, Year (although, I use No Year), and the dimension containing “Validate” will need the “NO_XXXX” member.  


Step 2: SmartLists


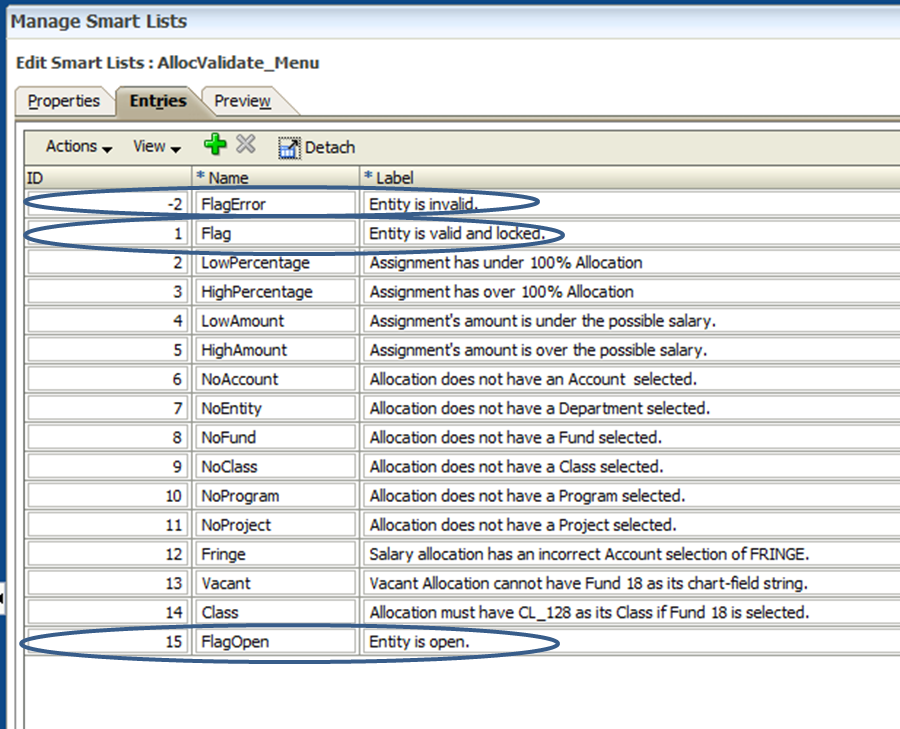
Building off the SmartList from Part 1, I added a few new entries. These entries will be used to display the status of an entity in the approval process, including: locked, open, and invalid. Additionally, I created a new SmartList to accompany the “LockFlag” member. This SmartList will be used by the users to lock and unlock their entity.  


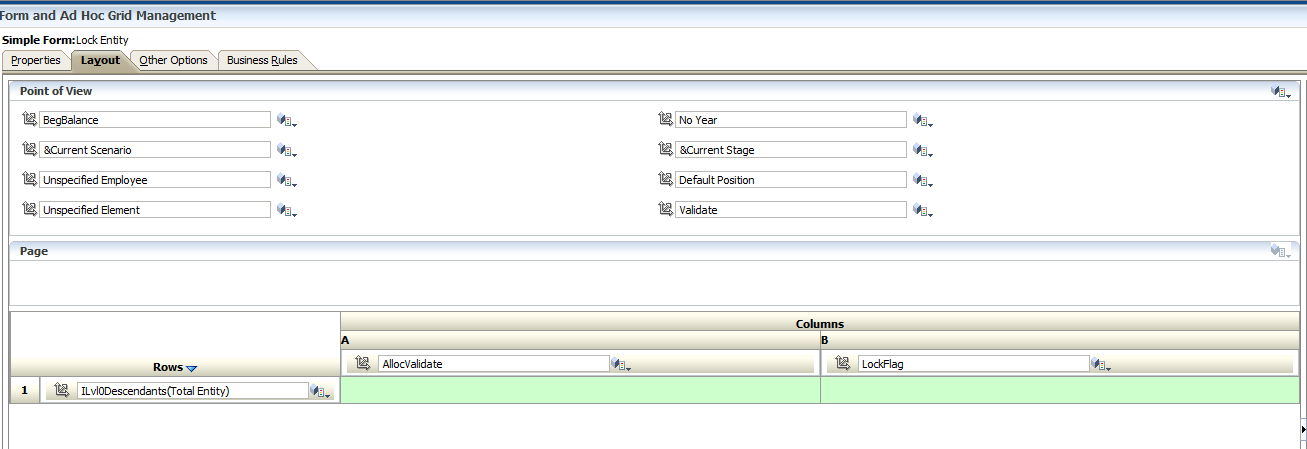
Step 3: Create the Data Form


Create a data form with following parameters:

Rows: Entity
Columns: AllocValidate and LockFlag
POV: All other members where the flag will be stored (including Validate)

Additional Specifications:
  • Make the column for AllocValidate Read-Only. This column will be modified based on the user selection for LockFlag in coordination with a business rule that will run on save.
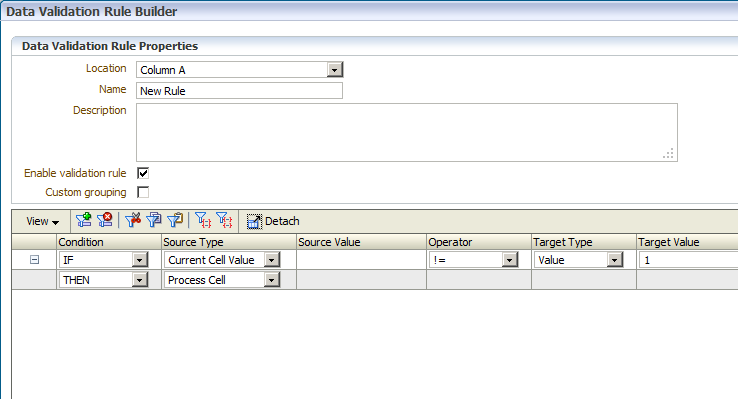
  • Add a Validation Rule for the AllocValidate column to show as invalid if the column does not appear as being locked.  


Step 4: Business Rules


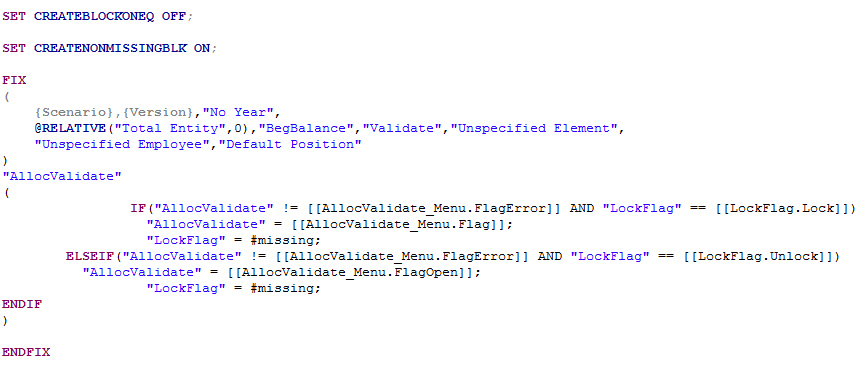
First, create a rule to run on save that will check for the “LockFlag” selection and update the “AllocValidate” status accordingly. The script should initially check if an entity has any error messages. If not, then it will lock or unlock based on the LockFlag selection. Note that this rule actually runs for all entities each time the save occurs. However, there is very little to no potential conflict issue between users, as the rule runs very quickly. However, this rule can also be run as a Menu option to select a single entity at a time if desired. An example script is shown below.

The rule checks if any validation errors already exist. If so, it changes the AllocValidate flag to appear as invalid.


If the rule detects an invalid entry, the rest of the rule is not processed. If there was no error found, the rest of the rule will lock or unlock based on the LockFlag selection.

Next, update each business rule to take the “AllocValidate” flag into consideration. If the flag’s current status is “Locked”, then we no longer want to run the business rule if it will change the current data set. An example is shown below, using the @RETURN function as well.

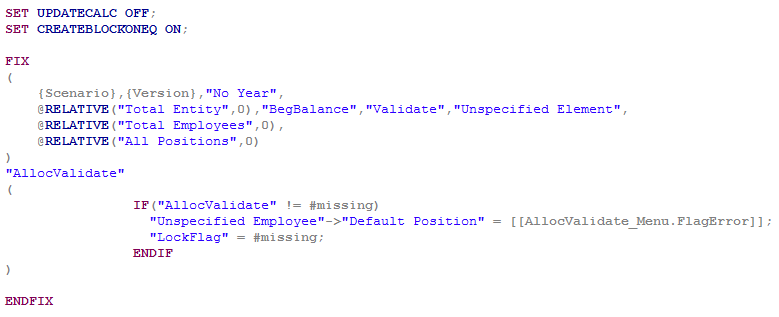
Lastly, I’ve udated the rule that was created in Part 1 to include an automated re-assignment of the AllocValidate lock status to be invalid, if an error occurs. This is to prevent an issue where the user locks the entity but then submits invalid data, as data entries cannot be prevented through the use of business rules.  The example below would assign an error to a specific assignment in addition to assigning the “Invalid” flag for the whole entity.

Step 5: Process Management


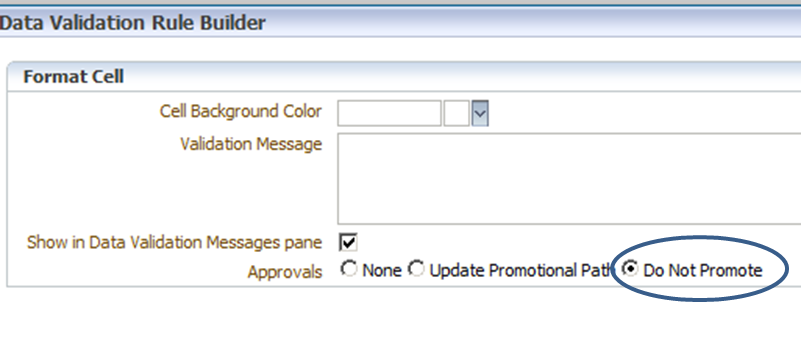
Process Management is a fairly complex subject within Hyperion Planning, so I will not be going into a lot of detail on the specifics of setting everything up as that could be its own blog…or two. The assumption here is that the decision has been made to use Process Management, which allows it to incorporate this validation process. The important part is to make sure to select the checkbox “Do Not Promote” within the options for the Validation Rule set up in Step 3. This will cause approvals to fail if it detects an error within the data form.


Step 6: Example


If you’re confused at this point, it’s quite understandable. I am as well. Nonetheless, let’s put everything together and actually go through a sample process that a user might go through.

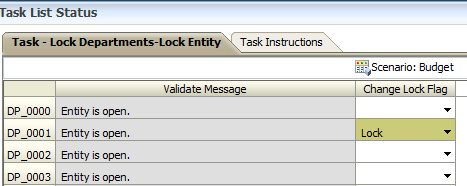
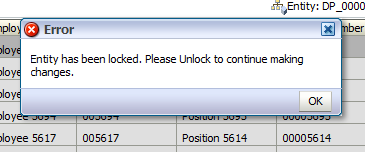
  1. The user has invalid data and is trying to lock department (entity) DP_0000. However, the rule has found a validation error.


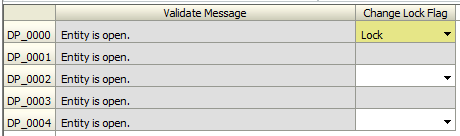
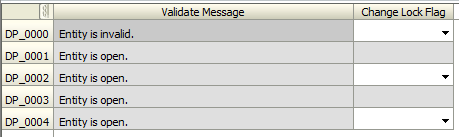
  1. The user can navigate to a form with the list of errors affecting all of their entities. The example below was the form that was created in Part 1.


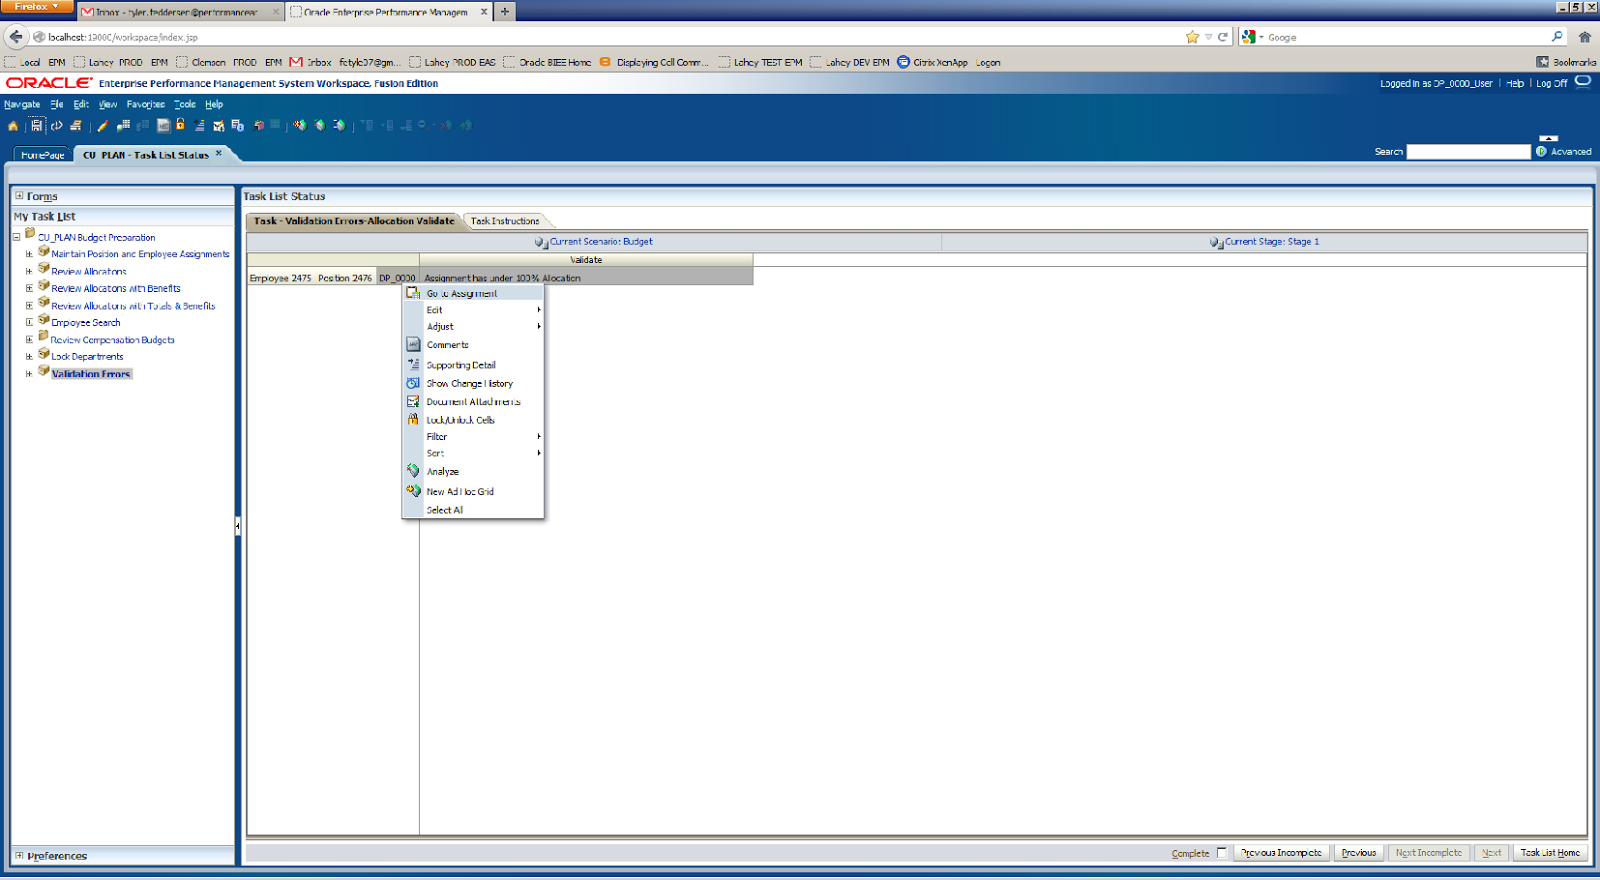
  1. The error is displayed on the form, and the user fixes the error. Note: My error flags were thrown off during the preparation for this demo, and the error doesn’t EXACTLY reflect the real error. We’ll pretend.


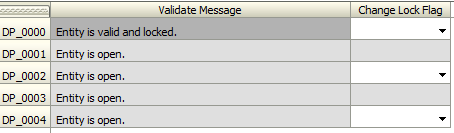
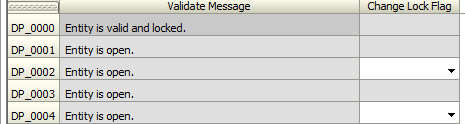
  1. After fixing the error, the user navigates back to the locking form and tries to lock again. The lock is successful this time.


  1. The user tries to run a rule to add a new position to the department that has been locked. Since this rule would change the data set that has been validated, an error is returned.


  1. The user goes back into the data set, entering a change to the data set that will cause an error to occur. The flag is automatically reset to be invalid.


  1. As an example for Process Management, we’ll pretend the user has approved the department successfully. In doing so, the depatment can no longer be unlocked unless the department is sent back, creating a completely locked down department.


Conclusion


By now, you probably get the gist of what is trying to be accomplished here. However, it all can get a litlte complex with how all of these pieces interact with each other. As mentioned earlier, all of these steps are just an example of how all of these pieces can work together to create a customized flow within any Planning application. They can be refined, simplified, or even expanded as needed. The best part about all of this is that it’s simply a new take on existing functionality, allowing developers and users to remain within the Planning technology. With the Hyperion functionality, we’re always attempting to achieve higher efficiency, and there is nothing more efficient than removing some redundant tasks from the administrator’s plate. Thanks to all for reading and a special thanks to Cameron as well for allowing me to hijack his blog for a few entries. Let me know if you have any questions or comments!

Cameron’s conclusion

So there you have it – a way to prevent planners from inputting incorrect data values.  It’s sort of the budget data quality Holy Grail for Planning administrators and consultants alike.  And oh yeah, business owners too.  This is awesome stuff and again my thanks to Tyler Feddersen for writing this and Performance Architects for allowing Tyler to write outside the walls of his company.  PA understands that sharing information is how we all grow and learn. Thanks for sharing, guys.

Be seeing you.

18 March 2012

Why I hate (and love) Calculation Manager, part 2

You had your (mostly) two minutes of hate.  Now what?  Ah, the love.

Honestly, I don’t hate Calculation Manager (CM).  There are some differences to HBR but what should anyone expect with a new product?  Of course it’s different.  And an awful lot of CM, from the Planning rule perspective, is quite nice.  So it’s time for love.

So is there anything new on the calculation front?

There sure is.  I’m not going to cover why a focused aggregation makes sense – you already know that because you either figured it out yourself (It came to me on a project in Binghamton, NY like a bolt of lightning and no, I have no idea why.  I wish I did because then maybe I could use that thinking process to come up with other good ideas which are, if I am being honest, far and few between.  A man can dream, can’t he?) or you read this post.  The theory still holds true.

There’s an issue with what I wrote almost three years ago (It is hard to believe it’s that long ago, but it is.)  What happens when there’s a shared rollup?  In this example, I have not so modestly named one “Cameron’s favorites.”  

We’ll get to that shared hierarchy but first a review of the focused aggregation approach.

Let’s review

Let’s take a look at the basic form (oooh, no more HTML – Smart View rocks!):

What the CM rule needs to do is only aggregate the ancestors of DVD Recorder and PA.  What does that code look like?


This is the same code as before.  I created application level variables for:  Year, Version, Scenario, Entity, and Segments.  The last one was a bit tricky but I described (erm, I stole it from another blog) above how to make it happen through creating a dummy variable, exporting it to xml, modifying the xml, and importing it back in in the previous CM post.

I deployed the rule from CM to the Planning app, and then assigned it to the form.  Move along folks, nothing to see here.  Okay, just for those who forgot, or haven’t bothered to read my two old HBR posts, I set the rule to Run on Save, Use Members on Data Form, and Hide Prompt to drive the run time prompts in my CM rule:


Remember those variables I set up in CM?  They are going to read that form.  Does it work?  Yep.

Here’s what the parent of DVD Recorder looks like in Planning ad-hoc mode:


I enter 1999 into the form and click on the Submit button.


And oh yes, I had one of these as a wee lad.  Looking back, I was (am) such a geek.  Destined for EPM, I think.  Clawing back to relevancy, let’s see what happens when I click on that Submit button.

And here’s what the data looks like after the save:


Does 287854 – 285855 = 1999?  Why yes it does.  

And how long does it take?  For those of you without the eyes of eagles, that’s 0.038 seconds.


How long does a CALC ALL take?  


Quite a difference, eh?  Even this limited calculation is quite a bit slower:


Again, for those who need spectacles, that’s 0.61 seconds.   

The focused aggregation takes 0.038 seconds.  That’s just over 6.2% of the time it takes to do the limited calc and just 0.36% as long as CALC ALL.  Pretty neat, eh?

But what about shared members?

This approach, alas, doesn’t work when you’re working with a shared rollup.  Not important you say?  Why not?  If you’ve entered data either in a shared rollup or in the base hierarchy, don’t you want to see the shared parent(s)?  @ANCESTORS and @IANCESTORS do not, unfortunately, handle this.  Let’s take a look at that approach.  

I modified the form so that only “Cameron’s favorites” shows up because I am a megalomaniac moron:


I then enter 1066 into the grid and click the Submit Data button:

And the result is:


Uh oh, the value should be 1,159,269, but Essbase/Planning returns 1,158,203.  What we need to do is bring in the new for 11.x @ALLANCESTORS and @IALLANCESTORS functions to the code.  Isn’t progress wonderful?
And what do we see?


The parent “Cameron’s favorites” now works.  Isn’t that nice?  But what about the real parent, “Electronics”?  Oh yes, it works as well.


And just a little bit slower – 0.056 seconds.  Which makes sense as more blocks are being calculated.

It’s all in the blocks

Or the number of blocks, to be more correct.  The fewer that are processed, the better, because disk access to read or write blocks is where an aggregation slows down.  Less blocks = less time, more blocks = more time.  Even I can follow this kind of logic.

For giggles, I used the SET MSG SUMMARY setting in the rules and then grabbed the following statistics from the application log.  Pretty eye opening, eh?  

Calc All

Total Block Created: [0.0000e+000] Blocks
Sparse Calculations: [2.3357e+004] Writes and [1.1164e+005] Reads
Dense Calculations: [1.0968e+004] Writes and [1.0968e+004] Reads
Sparse Calculations: [1.0695e+008] Cells
Dense Calculations: [2.6093e+007] Cells

NB – Ignore the dense calculations – that is because the sample application has an odd view of a BSO dense dimension (why exactly there are dense stored calculations is not known to me).  I (and you should, too, if you don’t already) only build fully dynamic dense Account dimensions.

Sparse calcs = 23,357 writes and 111,640 reads
Sparse calc cells = 106,950,000

FIX on AGG

Total Block Created: [0.0000e+000] Blocks
Sparse Calculations: [2.0330e+003] Writes and [6.8710e+003] Reads
Dense Calculations: [0.0000e+000] Writes and [0.0000e+000] Reads
Sparse Calculations: [9.3091e+006] Cells
Dense Calculations: [0.0000e+000] Cells

Sparse calcs = 2,330 writes and 6,871 reads
Sparse calc cells = 9,309,100

Focused Aggregation

First FIX

Total Block Created: [0.0000e+000] Blocks
Sparse Calculations: [8.0000e+000] Writes and [6.8000e+001] Reads
Dense Calculations: [0.0000e+000] Writes and [0.0000e+000] Reads
Sparse Calculations: [3.6632e+004] Cells
Dense Calculations: [0.0000e+000] Cells

Sparse calcs = 8 writes and 68 reads
Sparse calc cells = 36,632

Second FIX

Total Block Created: [0.0000e+000] Blocks
Sparse Calculations: [5.4000e+001] Writes and [2.0700e+002] Reads
Dense Calculations: [0.0000e+000] Writes and [0.0000e+000] Reads
Sparse Calculations: [2.4727e+005] Cells
Dense Calculations: [0.0000e+000] Cells

Sparse calcs = 54 writes and 207 reads
Sparse calc cells = 247,270

Total sparse calcs = 62 writes and 275 reads
Total sparse calc cells = 283,902

What’s my point?

To roll up a form, your code could process 23,357 writes and 111,640 reads (those are blocks, btw) or you could process 62 writes and 275 reads.  Which do you think is faster?

Reusable code

CM has a whole series of standard templates, mostly for use in graphical rules.  Actually, the graphical nature of a rule (you drag and drop objects into a flow) means that rules are a bit more like HBR Sequences although in fact CM has its own version of Sequences called RuleSets.  But tell me; isn’t this essentially stringing together multiple rules?  


Regardless, writing once, using many times is a good thing (unless you are in love with repeating the same code and maybe getting it wrong).  Let’s review how this is done in HBR before we go into CM and see what’s different.

Macros and Templates

HBR Macros

In HBR, there’s a (not used all that often from my experience) way to reference common code called a macro.  I like putting the focused aggregation script into a macro (or a template) as that code tends to get called again and again.  Putting it into a callable procedure means I can focus the unique code in each form and do the routine stuff simply by calling code.  

Here’s what it looks like in HBR:


The macro mcrConsHBRConsolFocusedAggTemplate is just the focused aggregation code:


Parameters
If I want to get fancy, it’s easy to pass positional parameters to a HBR macro:


On the receiving side of this macro it looks like this:


CM Templates
In essence, HBR macros are customized by you, the developer.  In CM, there are, as I mentioned, lots and lots of standard templates that do all kinds of interesting things.  Which I am going to ignore as you can go read the documentation far better than I can repackage it.  I will focus on Custom Defined Templates, or just plain old templates because I am just plain old Cameron.

Things are definitely a bit different in CM.  

Here’s what you can NEVER do in CM.  Or can you?

Being the generally ignorant kind of guy that I am (I have been called worse), my first instinct with a template was to drag it into the CM rule script.  Uh oh.
 Oh, that’s a nasty error.  But here’s the funny thing – if you deploy the rule, despite the nasty message, which looks just like the one where the RTP prompts weren’t valued, Failed to validate against Essbase. One or more unresolved RTPs found" [ID 1235676.1], it works.  I’m probably breaking all kinds of rules when I just drag and drop it but it works.

The approved way

Boo!  Hiss!  Who wants to do something the right way when hacking is available?  Oh, you mean people who don’t want to place their necks right on the chopping block and ask the executioner to swing the axe?  Nope, living out episode two of The Death of Mary Queen of Scots on Radio 4 isn’t a good idea.  So what is the right way?

It’s all graphical

It’s really a colossal pain, in my opinion, because you have to set the FIX statement in the first script.
 Then insert the template.

And finally insert the end FIX.  Not so easy to read as it requires a lot of clicking about.  But it does validate.  And I will note that this concept of using a flow chart to do this kind of thing is 100% the graphical CM way, so I guess I shouldn’t be surprised.

And one big thing you CAN’T do

I have to say there aren’t that many people out there that use parameters, but I have used it to drive rate types in HBR macros that calcuate currency conversion (one of these days I will blog that as well) for Planning applications.  

Remember this?


And this?


That ability to pass parameters simply can’t be done in CM.  My advice:  lobby Oracle to expand the functionality/don’t write code that works that way.  Such is life.

What’s your story, morning glory?

So is Calculation Manager (see, I am writing its full name for the end) a bust?  Nope, not at all.  Think of all of the Oracle components it addresses:
  • Financial Management
  • Essbase BSO
  • Essbase ASO
  • Oracle General Ledger (for Essbase)
  • Planning


That’s a fair bit more than HBR ever talked to (Essbase BSO + Planning).

And of course you can actually generate decent code with this graphical interface as opposed to the awful stuff that came out of HBR.

Did I mention that there are tons of predefined templates?

Did I also mention that if you use EPMA for Planning, you must use Calc Manager?  But if you’re using EPMA, you knew that already, and are using it.

While only time will tell if this is true or just a random rumor I picked up, it sounds like there’s a good chance EPM 11.1.2.2 is going to force you to move to Calc Manager even if you use Classic Planning.

And of course there certainly are a whole bunch of cool things in Calc Manger – I am a big fan of the way it organizes rules, variables, and just about everything else in a hierarchical manner,  of course no more inability to select an outline as HBR has suffered literally for years and no more insanely long Hungarian notation naming conventions as in Hyperion Businsess Rules.

All in all Calc Manager does bring quite a few things to the table.  I hope you’ve enjoyed this trip down Calc Manager lane, and maybe even learned a few things or two.  We even got a few unauthorized hacks in there as well to make life interesting.

And yes, I lurve you, Calculation Manager.  :)