Introduction
What you are about to read is not my work. No, I didn’t steal it, but instead I somehow recruited Tyler Feddersen of Performance Architects to write about this really clever technique to enhance validations in Hyperion Planning. Also, that will likely mean that the quality of what you are about to read is several levels of awesomeness above my usual drivel, so pay attention, this is good stuff.
Does this mean I work for Performance Architects now? Nope, I am still my one man band.
I know Tyler (and Chuck Persky and Jonathan Etkin) because they were incredibly gracious, helpful, and just all around awesome when I was writing my Kscope14 ASO Planning presentation with Tim German and needed some real world feedback on what that tool is like. Sometimes people think that consulting companies are ruthless competitors (okay, I am not exactly a competitor to that firm unless they’ve been fooling me and have just Tyler as an employee but in some sense we do compete) that don’t share. The hour long conference call I had with Performance Architects and the multiple emails back and forth show me that they “get it”. What a nice bunch of guys. I’m sure they treat their customers with the same generosity of spirt and technical acumen if they spent all that time and energy with me for free. You should hire them when you aren’t hiring me. ;)
And with that, every single word below except the conclusion is Tyler’s. Tyler, thanks for writing this and I look forward to part two.
Tyler Feddersen, Performance Architects (Big thanks as well to Mohan Chanila for making this readable)
What’s the big deal?
Data form validations offered in Hyperion Planning 11.1.2+ were a nice step in the right direction for easily identifying data entry errors. Additionally, a lesser known functionality that was introduced simultaneously was the ability to hook up these data form validations with Process Management. Unfortunately, there are a few caveats. First off, there are very few of us out there using Process Management. Secondly, even if you do…I’ve found the validation processing to be less than stellar if there are too many validations.
Facing similar issues, a fellow co-worker of mine, Alex Rodriguez, introduced the initial idea to use business rules as an alternative, which turned out to be quite efficient. Since then, I’ve expanded on the idea to create a full validation solution. I have to say…I like the outcome. In fact, I’ve used it in multiple recent Planning solutions. The result does not involve anything like code manipulation but rather is an innovative take on pieces of functionality that are already available. Part 1 of this solution will go through the creation of a process to identify errorneous data entry.
A Look Ahead
Below is an overview of what this blog will be attempting to accomplish. Some of the members may seem a little different since this was done on a PSPB application.
A correct data set.

After saving new data, an error is displayed due to an invalid entry. Note: The cell is highlighted with “red” by using the data form validations. If the data were to be saved correctly again, the form would again appear as the initial image.

Additionally, the error appears in a consolidated list of errors for administrators and/or users.

How It Was Done
Step 1: The Validation Member
The first step is to create a new member specific to validations. The sole use of this member is going to be for storing validation “flags” (SmartList values). This validation member should be created in a SPARSE dimension that will not be part of the validation logic. For example, I used the Budget Item dimension (sparse) in my application because I wanted the errors to be stored at a specific Employee/Position/Entity combination, but I did not care to see errors by specific Budget Item members. By using a Sparse member, the validation intersection will be able to load much faster on a data form using “Suppress Missing Blocks” since it has its own block.
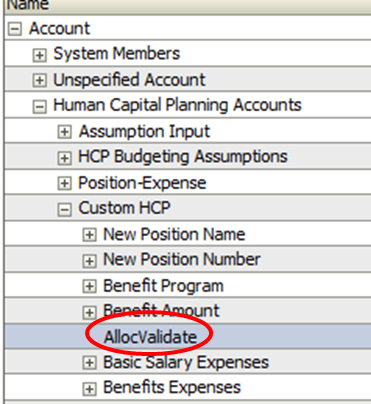
Note: In the images below, you will see that two members were actually used, one in the Budget Item dimension (Validate) and one in the Account dimension (AllocValidate). This was done for two reasons. One, it allowed me to assign the SmartList (coming up) to an Account and keep the Evaluation Settings untouched. Two, it allowed the form to display the error with a complete new column/row combination. However, similar functionality can be achieved by simply adding the single sparse member.

Hold up…is block suppression really THAT important?
Thanks for asking. Yes. The use of block suppression with this solution is incredibly important in getting an efficient final product . As we already know (or now you will), a block is needed for data in each sparse, stored member combination. If we create a validation member in the dense dimension and don’t trim down the possible sparse combinations, the validation form is going to need to process all blocks that exist in the entire system to return the validation errors. Meanwhile, by choosing one of the sparse dimensions and only using a single member within it (a validation member or other random member) , the number of evaluated blocks is knocked down to only those affected by the actual validations. Using the “Suppress Missing Blocks” option, Planning will suppress all blocks that contain no data prior to sending the query to Essbase.
For example, the image below shows the processed cells when a sparse member was utilized. Only two entire cells were processed when the Planning form was opened, due to one validation error existing.

Now, the image below shows the number of processed cells when the sparse member strategy was not used. Notice that the number of cells increased exponentially, even though there was still only one validation error existing.

While 10,168 cells may not seem like much relative to larger data sets, it represents every block in a fairly small and sparse data set. In a heavier model, the differences could go from Planning crashing to the form opening in a matter of seconds.
Step 2: The SmartList of Errors
Next, we need to create a SmartList with entries for each error to be tested. “AllocValidate_Menu” has been created in the image below.

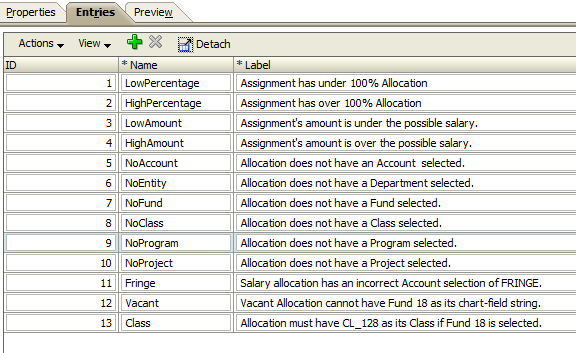
An entry should be put in for each desired error. In the image below, there are 13 different errors that can be flagged. For example, the second entry is used when a specific assignment contains over a 100% allocation.
Lastly, assign the SmartList to the Validation member that was previously created. In the example below, it is being assigned to the AllocValidate member, which exists in the Account dimension.

Step 3: Create the Business Rule
This step can either be accomplished by creating a new rule or by adding to an existing script. In the example below, the script is meant to be run on a data form with the Scenario, Version, Organization, Position, and Employee in the POV or Page. The rule then checks the total Percentage Allocation for the specified intersection. If the rule confirms an error, the following intersection will be assigned the error flag of having a high percentage:
{Scenario}->{Version}->{Organization}->{Position_Dim}->{Employee}->”BegBalance”->”Unspecified Element”->”No Year”->”AllocValidate”->”Validate”

Step 4: Create the Data Form
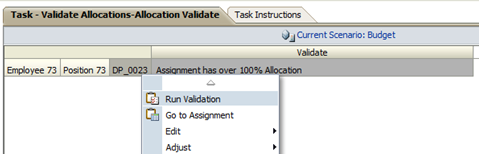
As with the business rule, this can be done by either creating a new form or adding to an existing one. In the examples provided at the beginning, both of these techniques were used. The example below also shows the addition of a menu item to the form. The menu item “Run Validation” will kick off the rule that was created in the third step to populate the data form.
Voila! A fully functioning error handling process is at your disposal. The complexity of this error handling can go as far as Essbase/Planning will take you. Since all of the error handling has been merged with the rest of the Planning solution, there are plenty of ways to explore additional features to this solution. Tune in for Part 2 to see a few ways on how this process can be expanded further, including the creation of a “locking” procedure to prevent business rule execution and an integration with Process Management.
Conclusion by Cameron
And there you have it – a really clever way to handle validations in Planning using the functionality built into the tool. Thanks again Tyler for sharing this.
Be seeing you.
3 comments:
Good stuff. I can definitely use this. Thanks!
The only thing I don't like about data validations is it will still allow the user to ignore the error and submit the data and process rest of the logic. What I used to do was to use @RETURN and then check whether validation is successful and then process the logic. I'm guessing that's going to be in PART II.
They did enhance the data validation to just check for existing blocks (it was not when it was introduced). A good use of Smartlists and data validation
I've generally only used @RETURN "stoppages" when it comes to business rules executed by menus, since the processing can be stopped before any data is modified. It gets a little difficult/complex to totally prevent data entry without the use of process management (if security and scenario properties aren't being reset). Part 2 should be coming soon and mentions some possibilities here, but I'm sure I'm missing some things that could be added to improve it all.
Post a Comment