A note
I have again managed to convince Philip to write a guest post. Actually, he suggested it but I like to think that I am Svengali or at least a salesman. Nope, this was all his idea. It’s really great that our EPM community can come together and share in this way.
And with that, and a wee conclusion at the end, take it away Philip!
Smart Push, this blog, and you
Cameron, some other consultants and I were given the opportunity to work with a Planning and Budgeting Cloud Service (PBCS) pod (Version 15.11.65). We could see, touch, and feel the latest version of Planning, including all the new functionality already included there. We were able to explore and experiment with the specifics of the Cloud Service and found that there are some major differences between working with an on-premises and cloud version. As an example, we (sort of, or have at least resigned ourselves to it) love EAS, because it gives us a feeling of control. During our exploratory work, I sometimes missed it, but seriously, I did not need it. Now, I can imagine a life without EAS. PBCS has much to offer and a different and often better way of handling common Planning requirements.
As Cameron noted, this series of PBCS blog posts is all about sharing our knowledge with the wider community as it marks a new era in the category of planning tools.
Smart Push Functionality
Smart Push is a method to push data into different Plan Types with a process triggered from a data form. You can push data including comments, attachments, and supporting detail from Block Storage Option (BSO) Plan Types into other BSO or Aggregate Storage Option (ASO) Plan Types. It is different from EPMA Data Transfer, partitioning, or @XWRITE/@XREF. It comes close to the existing on-premises data copy into the reporting Plan Type through scheduled transfers, but I think it is easier to set up and more integrated into Planning.
Why is this so exciting?
Some users want to see the results at aggregated levels of the data input they have saved a few seconds ago. Yes! They also want to have all their KPI’s and Variances calculated as well. Yes! And you want to deliver, because you are so nice to them!
First, you tried aggregations. Then you needed to optimize these aggregations to the very last. Then you were having a reporting Plan Type in your Planning application, and you have built scheduled transfers running each couple of minutes and eating much of your server resources. Ugh, ugh, and ugh. No, do not give up. Smart Push comes to the rescue.
This post will cover how you can implement this functionality and show you how it really works using the PBCS version of the sample Vision application which has a reporting Plan Type.
How to do this?
First, you need at least two Plan Types in your Planning application to connect these. A reporting Plan Type will do very good as a target although it could be other kinds of Plan Types if required.
The next step will be to map the source to the target. In this we need to take care of the dimensions, the point-of-view and the data options. Conceptually, this is familiar ground.
We will then define this connection in a data form and configure that form to run the data transfer on the save data process.
Lastly, I will show an example where Smart Push is tested with data.
Whoops, really lastly, I will show in the Simplified Interface where to check for errors.
Map Reporting Application
The first step is to map the reporting application. This target can be any BSO or ASO Plan Type in the Planning Application. Select the menu “Administration” and then the option “Map Reporting Application”.
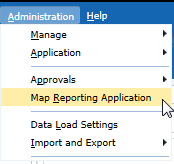
Figure 1: Administration menu to select the option “Map Reporting Application”.
The window “Map Reporting Application” opens. Here you can see existing mappings and with the green plus sign, new mappings can be created.

Figure 2: Overview of the mapped applications.
It is best practice to use a name which describes the mapping of the source and target Plan Type. I have taken here the name Plan1-VisASO. Accordingly, I take “Plan1” as the source and “VisASO” as the target Plan Type. Please note, multiple connections can be made between Plan Types.
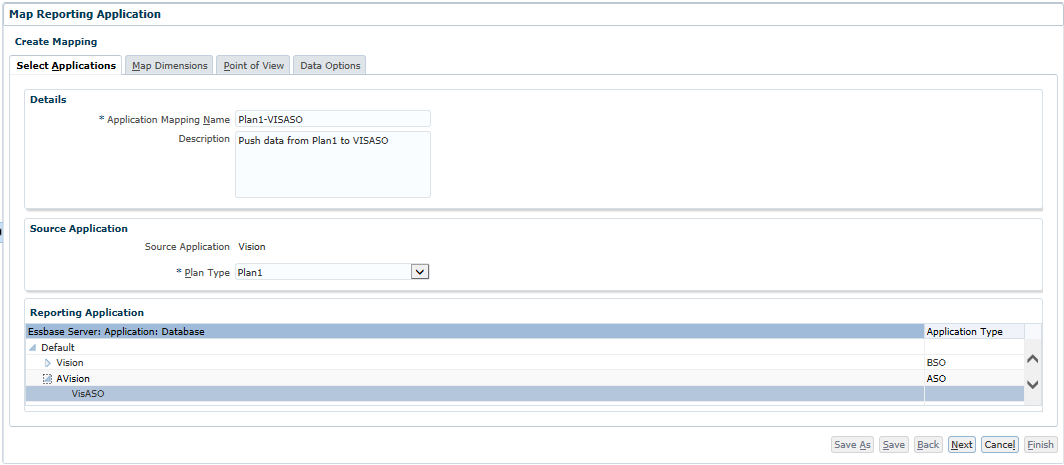
Figure 3: Selection of source and target Plan Type.
In the second tab is called “Map Dimensions”. Here, the dimensions between the source application and the target application are mapped. There are 3 options for this:
- Not Linked
- Dimension to Dimension
- Smart List to Dimension

Figure 4: Mapping of the dimensions.
In the member selection column, a selection can be made of the members of the individual dimensions. Therefore, it is important to know, which members exist in both Plan Types, otherwise the data cannot be captured at the receiving side.
There is no dimension “HSP_View” in the reporting application “AVision” and there is no dimension “AltYear” in Plan1 cube of the planning application. Therefore, no Element has been selected in figure 4 for this dimension “AltYear”.
Note: At least one dense dimension and the “Account” or “Period” dimension must be mapped. This is also visible at the upper section of figure 4.
When opening the Dimensions section in the Administration menu, one can select the receiving Plan Type, which is in our example “VisASO”, and see the reduced member set of the dimension accounts as shown in figure 5.
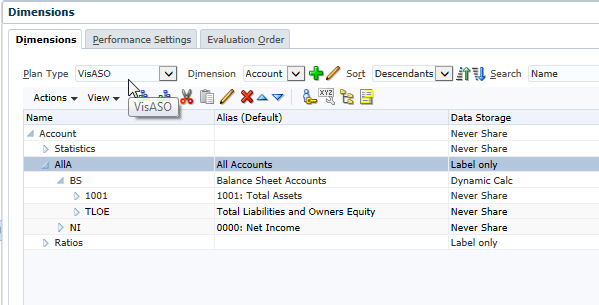
Figure 5: Account dimension of Plan Type “VisASO”.
In the member properties, you can see at the Source Plan in which Plan Type the data is stored. The checkmarks further down at the Plan Type section show in which Plan Type this member exists. In this example it is in the “Plan1” and “ViSASO”. Unchecking it will remove this member and all descendants from this Plan Type. Therefore, take caution here!
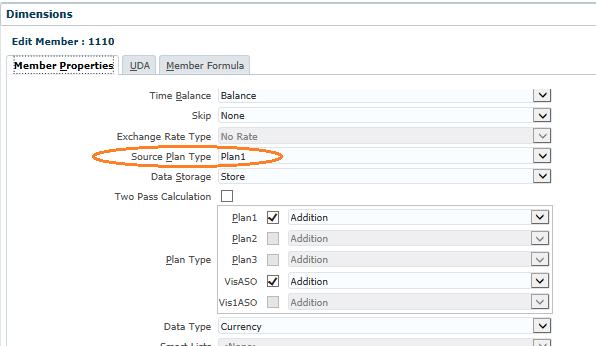
Figure 6: Member Properties and Plan Type selection.
Because we have a mismatch on dimensions between the Planning application and the Reporting application, we need address this in the “Point of View” tab. Here the member from the dimension is chosen which holds the data and which will serve as a placeholder for the missing dimension. In figure 7 you see the member “Base Data” selected for “HSP_View” and the member “FY09” for the dimension “AltYear”.

Figure 7: Mapping of the POV.
At the last tab of the Map Reporting Application you can see the “Data Options”.
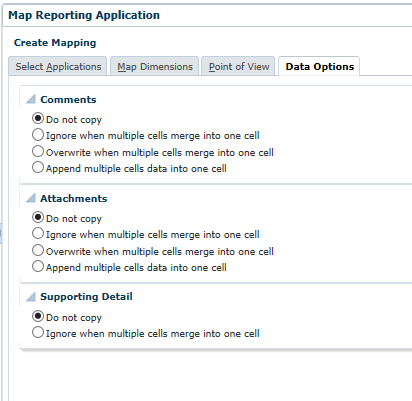
Figure 8: Options about pushing comments, attachments and supporting detail or not.
Note the Interesting option “Append multiple cells into one cell”. This is new functionality that will merge the comments and attachments in the relational data source. This is impossible to do out-of-the-box.
Now, all settings were done and we can save the mapping. As you can see, multiple mappings are possible in this window (figure 9). In the next section I will continue on adding the mapping to a data form and enable Smart Push. This is the real new part.

Figure 9: Saved Application Mapping.
Activate Smart Push in Form Management
The next step is to enable Smart Push in Form Management. As you can see in figure 10, there is a new tab called “Smart Push”. Here you can add, change and remove Smart Push definitions of this data form.

Figure 10: Enable Smart Push at the data form.
After pushing the add connection button, a window with all mappings will be shown for selection. In this, I select the mapping created in the previous steps.
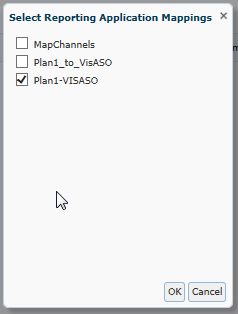
Figure 11: Selection of the Application Mapping.
It is very important to select the option “Run on Save”. This rather tiny option is on the top right side of the window.
Usually, you will select the option “Use Form Context” for all dimensions, but there is an option to overwrite the selection of the data form. An example is shown in figure 12. In other words, technically, you can copy data from Scenario A on the data form into Scenario B in the Reporting application. It is possible to add a few members into the selection. Mmm, this will be interesting…
It is also possible to add more than one mapping to one data form. Pushing the same data into different locations….

Figure 12: Setting about Form Content and example of an Overwrite Selection.
This is really smart, isn’t it?
I saved the form and now move over to test it.
Testing of Smart Push
I am doing some data entry on the data form. Then pushing the save button.

Figure 13: Data on the form before save and kicking off Smart Push.
The Smart Push actions always take place after the save and calculate process.
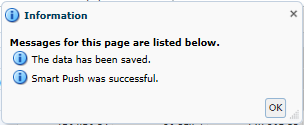
Figure 14: Information box after save data. Smart Push was successful.
Figure 15 shows the situation in the reporting application before pressing the save button on the data form. We see there is no data in the reporting application on the same POV as at the data form of Plan 1. We have selected the member “FY09” in the Dimension “AltYear”. This is where we defined the data target to be in the mapping.
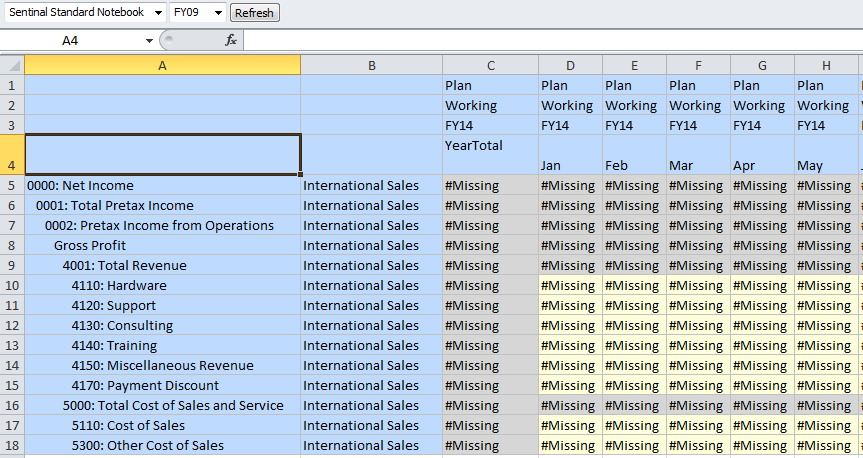
Figure 15: Reporting Application (VisASO) before saving data in the “Plan1” application.
Figure 16 shows the situation after pushing the data into the reporting application. At level 0 the data look fine. We see summarized data in the member “Sales”, but the amount on “Net Income” -> “Sales” is incorrect!

Figure 16: Reporting Application (VisASO) – the data were pushed over and aggregate into the nodes.
Where is the problem for this delta? We see in the reporting application data too low for ”Gross Profit“ and see no data for ”Total Cost of Sales and Service“. This is missing and did not get transferred. When we have a look at the data form used for the Smart Push, we see these members are not included in the selection and not present on the data form.
To correct the situation, I added the “Cost of Sales” member onto the data form and repeated the data entry and save. This did the Smart Push of the data again.
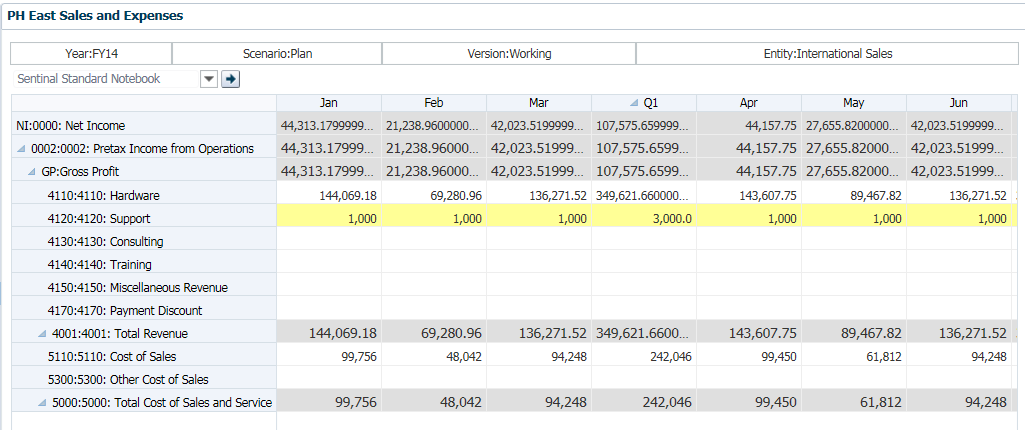
Figure 17: Data at the modified data form, now including the Member “Cost of Sales”, save and Smart Push.
When reviewing the data in figure 18, then I see the correct values for “Net Income” -> “Sales”. The Smart Push is looking at the data form for which data to transfer.

Figure 18: Reporting Application (VisASO) – now the data of “Cost of Sales” were pushed as well and aggregated.
Smart Push always clears the target data area before loading the data. In other words, also #missing values are transferred.
There is a log file on Smart Push Processes. The application manager should review this for areas of problems. The interesting part is, you can see this log only in the Simplified Interface. To get there, select the option “Console” > “Jobs” and set the filter.

Figure 19: Adjust the jobs filter for Smart Push.
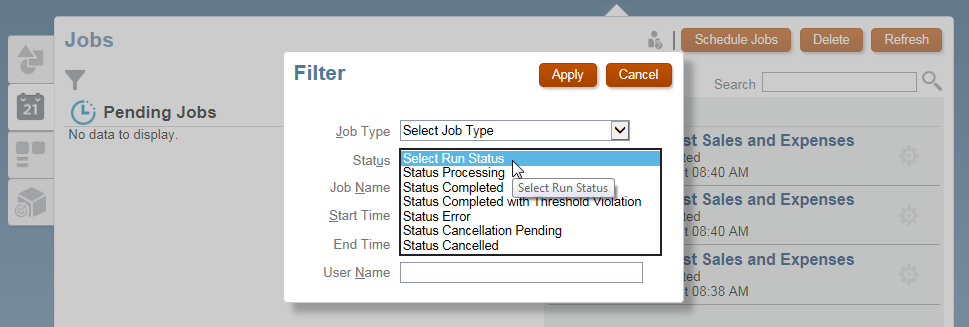
Figure 20: Then select the status.
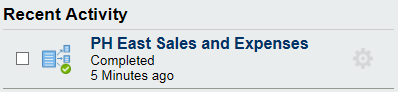
Figure 21: Example of Smart Push Job in the overview.
Philip’s final comments
Smart Push is already widely adopted within PBCS Planning applications and will be in on-premises whenever that comes out because it is so powerful and can thus be applied with a lot of creativity. However, it is very important all data is copied. Nothing kills the reputation of an application faster than wrong data.
Likely a data transfer process needs to be established next to Smart Push, which synchronizes all data. Smart Push is for the end-users who need to see their changes without waiting for some admin process to finish.
Compared to partitioning, @XWRITE and other options of data transfer, Smart Push is rather simple to configure and maintain. I am sure you will love it too!
Regards, Philip Hulsebosch.
Cameron’s final comments
Philip, again thank you so much for putting all of this hard work into this post. We all owe you a debt of gratitude for showing us on-premises luddites how Smart Push works. I (we) can hardly wait till it and the many other cool features of PBCS makes it to on-premises.
Be seeing you.
9 comments:
Gday guys,
Nice write up - really can't wait til this functionality comes to on premise!
Quick one for you - since smart pushes happen 'last' in a dataforms calculation process, any cunning ideas on how you could trigger a calculation on the target cube after the push?
Obviously it wouldn't matter if the target is ASO, but if you're trying to push to BSO its a little painful.
Hybrid isn't the default for BSO (nor an option) in the cloud yet is it?
Cheers,
Pete
Great Post. Curious to know how is the performance compared to datacopy/xwrite ?
Thanks for this. Have been excited about this feature, but I also agree "...a data transfer process needs to be established next to Smart Push, which synchronizes all data".
I have no idea how it would work, but would it be far fetched to be able to execute the Smart Push in a rule instead of separately setting up XWRITE's?
Joachim
Great post.
If the source and target dimension names has to be the same, could you please let me know how would I handle the below scenario?
I have an account 123 in both the Plan types. 'Source Plan Type' for this account is Plan type B (source). I have smart push'ed the budget data from Plan type B to Plan type A for the Account 123. Now if I need to load the Actual data to Plan type A in to the Account 123 for my variance reporting, system would not let me do that because 'Source Plan Type' for this account is Plan type B.
One interesting thing about Smart Push is that while it uses a Map Reporting Application, it isn't using the same functionality (export/transform/load). It actually is "opening" the form to push the data based on the context and override selections. However, there are also default application properties to control how many cells can be opened for web forms (cannot be changed in PBCS as it can be on-prem). Because of these two items, I believe there is a limit as to what can be pushed. Generally, this isn't an issue. However, a form having multiple large dimensions nested in the rows could return an error since the context of the those dimensions would usually be large ranges of members.
Hey Tyler,
that's interesting - I'm guessing you tracked that down the hard way?
I wonder what 'magic' they are doing - I assumed it was just a variable driven export script and load.
That being said, definitely looks like they've added some interestingly functionality to calc manager in the CDF layer that would allow for a lot of these actions to occur directly from within Calc manager. See below:
http://www.network54.com/Forum/58296/message/1464728475/if+you+are+on+latest+Calc+Manager
Cameron - this does lead back to the conversation around 'calculation logic' moving out of essbase and into the planning\calc manager layer. Interesting outcome.
Cheers
Pete
I'm in the middle to setting up BSO to ASO using Smartpush in PBCS. Is there a way to prevent users from submitting data to ASO? We allow users to submit data through Smart View using hssetvalue and in testing I was able to submit data to the ASO database (as an admin), but I don't want anyone doing this. I want to force users to submit data to BSO and smartpush it to ASO or things will get out of balance.
Thanks,
Chad
One additional issue I’ve come across is the data limit on Smart Push. On detail data entry forms Smart Push works fine, but if you try to setup a summary form (as recommended by Oracle) to push all data for an entity it fails due to a data limit. Oracle currently has a bug filed to fix this.
This doesn’t happen when you run the data map from Administration>Map Reporting Application. It only happens when you attach the data map to a form and run Smart Push.
Thanks,
Chad
Post a Comment